“The single most important factor in predicting and possibly treating IT band problems is hip abductor strength.” John Davis, Running Writings
A weak link is found
My last post discussed finding and fixing our weak links. Well, during a trail run I found a weak link and the quest is on to bring it up to a respectable level. At this point I’ve boiled it down to poorly functioning glutes–the glute medius to be specific. Glute dysfunction is fairly common and I’m realizing more and more that I’ve had a good dose of it for quite some time. It’s gotten better but I’ve got to make it better yet. Right now this weak point is causing me some knee pain.
Inside IT band syndrome
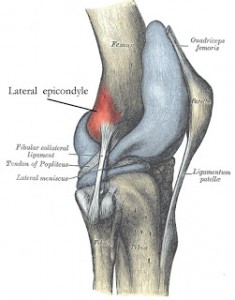
Lateral epicondyle; where IT Band pain is typically felt
Recently, while finishing a long trail run, I began to feel the dreaded symptoms of IT band syndrome (ITBS). Chances are, if you’re a runner then you either have or you will experience this issue too. If you look at the Wikipedia entry on ITBS you realize this is a mysterious ailment that might be caused by a myriad of issues from the feet to the hips, from the muscles to the bones, from too much running or cycling or rowing or dancing or whatever else you might do on one or two legs. Conventional treatment ranges from ice to ultrasound to stretching to orthotics and various pain drugs like ibuprofen. (Do we really think that ITBS was caused by a lack of ibuprofen or an absence ice sitting on our knee?) I want to fix this issue and clarify what’s at work here. Let’s see if I can make some sense.
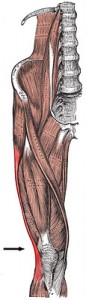
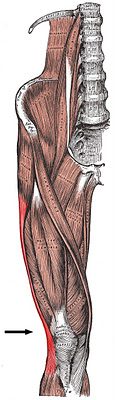
IT Band insertion
ITBS symptoms
The most typical symptom of ITBS is lateral knee pain, somewhere in the neighborhood of what you see on these two pictures. That’s where the IT or iliotibial band inserts. As is typical, I felt a sudden onset of pain at this site while running downhill. It’s a fairly sharp pain. Knee flexion while stepping down off a step often brings it on. Apparently, ITBS can be felt elsewhere along the IT band.
The research: It’s all about the hip abductors.
I found some superb articles with some very valuable information regarding the root cause(s) of ITBS and how to address the issue. Biomechanical solutions for iliotibial band (IT band) syndrome / ITBS comes from RunningWritings.com. Glutes rehab – recent research and Gluteus medius – evidence based rehab come from Running-physio.com. There is some overlap between these articles and they all refer to quite a bit of important research. If you’re a trainer who’s working with someone who has ITBS or if you’re suffering from ITBS, I strongly suggest you read these articles. I’ve summarized some things but definitely go to the sources for a thorough rundown.
Both sources cite a study from Stanford, and here’s what you need to know:
“Long-distance runners with ITBS have weaker hip abduction strength in the affected leg compared with their unaffected leg and unaffected long-distance runners. Additionally, symptom improvement with a successful return to the pre-injury training program parallels improvement in hip abductor strength.”
Some sources suggest that foot/ankle dysfunction–specifically over-pronation–is at the cause of ITBS rather than hip dysfunction. Irene Davis and others of the University of Delaware studied both the hips and feet/ankles. They stated:
“However, aside from this variable [an increase in rearfoot inversion moment], these results begin to suggest that lower extremity gait mechanics [i.e. foot and ankle] do not change as a result of ITBS. Moreover, the similar results of the current study […] suggest that the aetiology of ITBS is more related to atypical hip and knee mechanics as compared to foot mechanics. Therefore, the current retrospective study provides further evidence linking atypical lower extremity kinematics and ITBS. (Ferber et al.)”
The Running Writings article discusses several other studies that had similar findings to the Stanford study. The writer reached this conclusion:
“At this point, the evidence overwhelmingly points to a biomechanical fault in the abductor muscles of the hip as the root cause for IT band syndrome. Weak or misfiring gluteus medius, gluteus minimus, or tensor fasciae latae muscles are unable to control the adduction of the hip and internal rotation of the knee, leading to abnormal stress and compression on the IT band. This muscular dysfunction manifests as excessive hip adduction and knee internal rotation, both of which increase strain on the iliotibial band and compress it against the fatty tissue between the lateral femoral epicondyle and the IT band proper, causing abnormal stress and damage. But although the pain is coming from the lateral knee, the root of the problem is coming from the hip muscles.”
(By the way, the hip abductors of which I speak consist of the gluteus maximus, gluteus medius, gluteus minimus and the tensor fascia latae or TFL. See below.
Here’s something important: Very often the glute medius doesn’t do its share of the work and the TFL does too much work. Therefore it becomes important to condition the glute medius while de-emphasizing TFL activity. The side-lying hip abduction exercise (described below) works particularly well for activating the glute med while minimizing TFL activation.)

Hip abductors. If they’re weak, your knees will probably hurt.
The Running Writings piece also says, “a doctoral thesis by Alison Brown at Temple University also investigated (hip abductor) muscle strength in runners with and without ITBS; interestingly, she found no difference in maximal strength, but a significant difference in endurance.”
On a slightly different note, a recent study in Medicine and Science in Sports and Exercise indicates excessive hip adduction (adduction is the opposite of abduction; If you adduct too much then you’re not abducting enough.) is a precursor to patellofemoral pain or PFP. So again, we see abnormal hip mechanics playing a role in knee pain in runners.
Finally, the Running Writings article does a nice job of dispelling some myths about ITBS, among them the idea of foam rolling and/or stretching the IT Band. I won’t go into all of it but the bottom line is: Don’t bother. The IT band isn’t the problem–it’s the hip abductors! Work on them.
Tredelenburg gait
What happens when those hip abductors fail to do their job? We get what’s called Trendelenburg gait. Here’s a picture of it. Notice the right
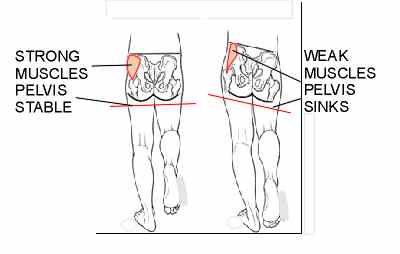
Trendelenburg gait
hip drops. When that happens the hip muscles on the left are stretched which puts prolonged tension on the IT band. That excess tension may cause pain at the IT band insertion located on the knee. There’s your pain.
Testing the abuductors
Heeding the observation that hip abductor endurance is key to ITBS, I tested that endurance using the old-fashioned, Jane Fonda-style side-lying hip abduction. (I elected to forgo leg warmers.) I got to almost 30 reps on my right leg (the affected side) and the hip was dying. I got to 30 reps on the left leg and with only moderate fatigue. I’ve seen similar performances in several other clients and my wife who also has some ITBS. This all fits in line with what this research found.
The exercises
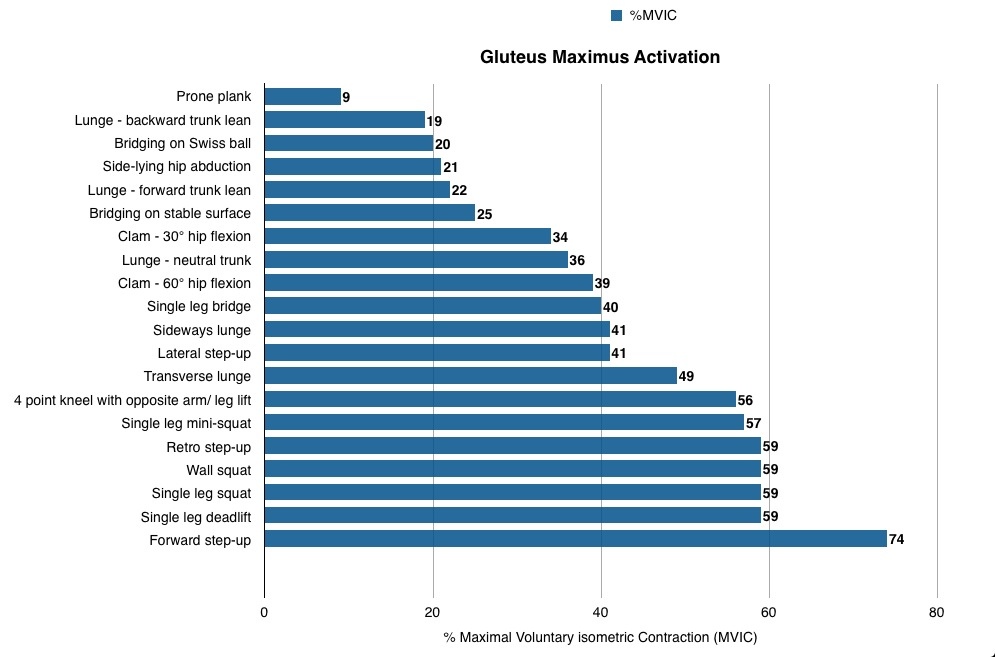
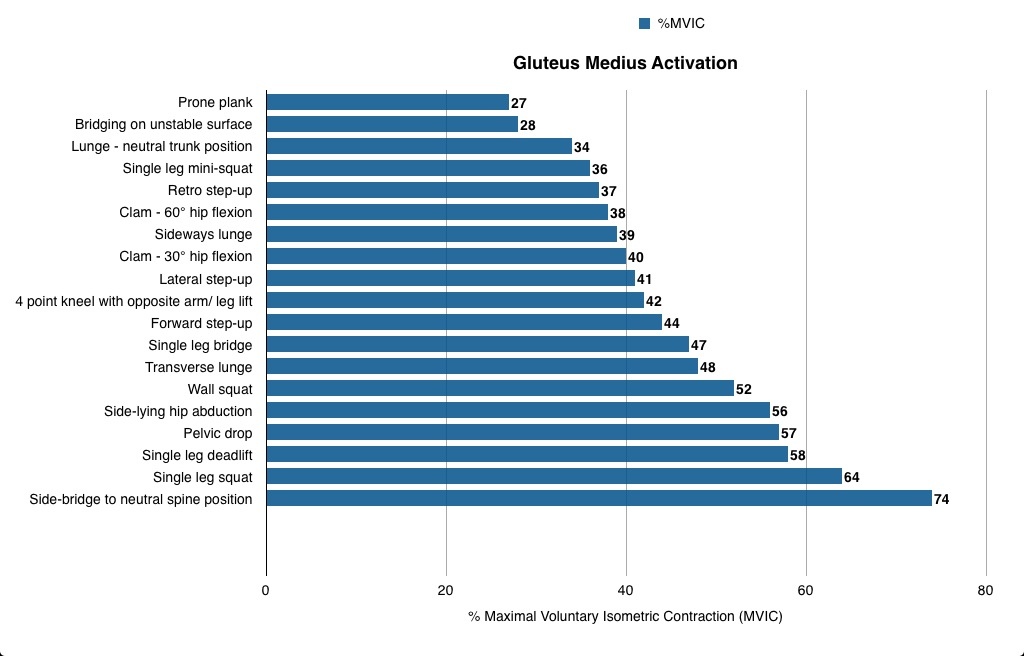
The two articles from RunningPhysio do a great job of discussing a wide variety of exercises that engage the glutes. In Glutes rehab: recent research we see research on the exercises that elicit the most contraction from both glute medius and glute max. Look at the tables below to see which exercises get the most out of these muscles. (I’m not sure exactly how all of these exercises were performed.)
Here’s RuningPhysio’s take on how to apply this information:
Practical application
From the research findings a good programme for runners wanting to target GMed would be starting with single leg mini-squat, side-lying abduction and pelvic drops and progressing to single leg dead lift, single leg squat and side-lying bridge to neutral. For advanced work you could add leg weight to side-lying abduction or combine side plank with upper leg abduction. This set of exercises would start with at least moderate GMed activation and progress to in excess of 70% MVIC. It would contain both functional weight-bearing exercises that are a closer fit to the activity of running, and non-weight bearing activities like side-lying abduction which has been shown to activate GMed without increasing unwanted activity in TFL and anterior hip flexors (McBeth et al. 2012) and has been used successfully to rehab runners with ITBS (Fredericson et al. 2000).
Runners wanting to improve GMax could start with single leg bridge, lunge with neutral trunk and single leg mini-squat and progress to single leg squat, single leg dead lift and forward step up. All of these exercises are ‘closed chain’ single leg activities where the GMax provides power to extend the hip but also works to help stabilise the hip and pelvis. As a result they are fairly functional for runners as GMax has a similar role during running.
In Gluteus Medius: Evidence-based rehab, the writer very wisely discusses differences in what we might call “functional” vs “non-functional” exercises. (This article also describes most of the exercises you’ll want to employ.) Generally, we might say a functional exercise would look like something we do in real life. A 1-leg squat or 1-leg deadlift is an example. These exercises have us standing (weight bearing) and using the whole body in concert. We don’t isolate a muscle in a functional exercise but rather we train a movement pattern and integrate lots of muscles together. In contrast, a non-functional exercise tends to isolate a muscle. The side-lying abduction or side plank are examples of non-functional exercises. These exercises don’t much resemble anything we do during most of our daily activities or sports. That doesn’t mean they don’t have value though, and the article does a nice job of discussing this issue. The article states:
“Closing thought, from the research I’ve read and patients I’ve seen, a combination of both functional weight bearing and less functional (sidelying) exercises is most likely to be effective in glutes rehab.”
My process
Like I said, my right glute med is indeed easier to exhaust than my left. I figure though that I should work both sides with a little extra work on the right. I’ve been doing lots of the side leg raises and side planks. I can’t yet do a good side plank while abducting the top leg. That’s a tough one. It’s one to shoot for in the future. I’m also doing a lot of band walks. I don’t loop the band around my ankles though, I loop it around my feet. This study determined that placing the band around the feet recruits more glutes and less TFL. These are sort of the non-functional exercises that I do pre-workout or first thing in the morning.
Pre-workout or throughout the day:
- side-lying hip abduction: 2-3 sets x 10-20 reps. I go to exertion.
- side planks: 2-3 sets x 10-20 seconds
- band walks: I side shuffle as well as walk forwards and backwards. I go to exertion.
- Hip hikes: Easy to do. This movement has you lifting the pelvis away from the Trendelenburg gait pattern.
Functional/main exercises:
-
1-leg squat: 3 x 8-15 reps. I recently used a kettlebell in the arm opposite my stance leg. I focus on keeping my pelvis level, knees somewhat apart and I don’t let my non-stance side hip drop which is very important. I also throw several reps in randomly throughout the day.
-
1-leg deadlift 3 x 8-15 reps: I often hold one or two kettlebells, dumbbells or a barbell.
-
Off-set step up: 3 x 6-12 reps use a knee-high plyo box for this. I hold a dumbbell on the side opposite my stance leg. I drive up powerfully with the stance leg then do my best to control my descent back down. I don’t plummet back down uncontrolled.
-
ice skaters: 3 x 12-20 reps. This is a power exercise in which I drive side to side in an explosive manner. There’s no way to do this without using the glute medius.
-
1-arm carries/farmer walks: I carry a kettlebell in one hand and walk. Very functional and simple to do.
These exercises do a great job of conditioning our movement sling system. Read here and here to learn more about these systems of muscles that work together as we move.